วันเสาร์ที่ 26 ตุลาคม พ.ศ. 2556

How To Reset a Windows 7 Password


If you need to reset the password to Windows 7 on your computer, likely because you've forgotten it, let me first assure you that not only is this very possible, it's not even that difficult.
Unfortunately, aside from a password reset disk (discussed in Step 14 below) there is no Windows-provided way to reset a Windows 7 password. Luckily, there is the clever password reset trick I've outlined below that's easy enough for anyone to try.
Prefer screen shots? Try my Step by Step Guide to Resetting a Windows 7 Password for an easy walk-through!
Note: There are several additional ways to reset or recover a forgotten Windows 7 password, includingpassword recovery software. For a full list of options, see my Help! I Forgot My Windows 7 Password!.
If you do know your password and just want to change it, see How To Change Your Windows 7 Password for help with that.
Follow these easy steps to reset your Windows 7 password:
Difficulty: Average
Time Required: Due to the several steps involved, it could take 30 to 60 minutes to reset your Windows 7 password

Here's How:

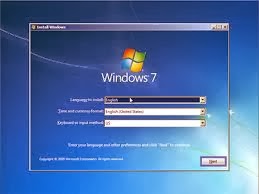
  1. Insert either your Windows 7 installation DVD, or a Windows 7 System Repair disc, into your optical drive and then restart your computer. If you have either on a flash drive, that'll work too.
    Tip: See How to Boot From a CD, DVD, or BD Disc or How to Boot From a USB Device if you've never booted from portable media before or if you're having trouble doing so.
    Note: If you don't have original Windows 7 media and never got around to making a system repair disc, don't worry. As long as you have access to any other Windows 7 computer (another in your home or a friend's will work fine), you can burn a system repair disc for free. See How to Create a Windows 7 System Repair Disc for a tutorial.
  2. After your computer boots from the disc or flash drive, click Next on the screen with your language and keyboard choices.
    Tip: Don't see this screen or do you see your typical Windows 7 logon screen? Chances are good that your computer booted from your hard drive (like it normally does) instead of from the disc or flash drive you inserted, which is what you want. See the appropriate link in the tip from Step 1 above for help.
  3. Click on the Repair your computer link.

    Note: If you booted with a system repair disc instead of a Windows 7 installation disc or flash drive, you won't see this link. Just move on to Step 4 below.
  4. Wait while your Windows 7 installation is located on your computer.


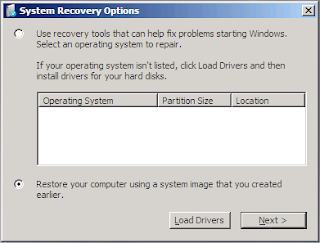
  5. Once your installation is found, take note of the drive letter found in the Location column. Most Windows 7 installations will show C: but yours may be different.

    Note: While in Windows, the drive that Windows 7 is installed on is probably labeled as the C: drive. However, when booting from Windows 7 install or repair media, a hidden drive is available that usually isn't. This drive is given the first available drive letter, probably C:, leaving the next available drive letter, probably D:, for the next drive - the one with Windows 7 installed on it.
  6. Select Windows 7 from the Operating System list and then click the Next button.
  7. From System Recovery Options, choose Command Prompt.


  8. With Command Prompt now open, execute the following two commands, in this order:
    copy C:\windows\system32\utilman.exe C:\
    
    copy C:\windows\system32\cmd.exe C:\windows\system32\utilman.exe
    
    To the Overwrite question after executing the second command, answer with Yes.
    Important: If the drive that Windows 7 is installed on in your computer is not D: (Step 5), be sure to change all instances of C: in the commands above with the correct drive letter.
  9. Remove the disc or flash drive and then restart your computer.
    You can close the Command Prompt window and click Restart but it's also okay in this situation to restart using your computer's restart button.
  10. Once the Windows 7 logon screen appears, locate the little icon on the bottom-left of the screen that looks like a pie with a square around it and then click it!
    Tip: If your normal Windows 7 logon screen did not show up, check to see that you removed the disc or flash drive you inserted in Step 1. Your computer may continue to boot from this device instead of your hard drive if you don't remove it.
  11. Now that Command Prompt is open, execute the net user command as shown, replacingmyusername with whatever your user name is and mypassword with whatever new password you'd like to use:
    net user myusername mypassword
    
    So, for example, I would do something like this:
    net user Tim 1lov3blueberrie$
    
    Tip: If your username has spaces, put double quotes around it when executing net user, as in net user "Tim Fisher" 1lov3blueberrie$.
  12. Close the Command Prompt window.
  13. Login with your new password!
  14. Create a Windows 7 Password Reset Disk! This is the Microsoft-approved, proactive step you should have done a long time ago. All you need is a blank flash drive or floppy disk and you'll never need to worry about forgetting your Windows 7 password again.
  15. While not required, it would probably be wise to undo the hack that makes this work. If you don't, you won't have access to accessibiily features from the Windows 7 login screen.
    To reverse the changes you've made, repeat Steps 1 through 7 above. When you have access to Command Prompt again, execute the following:
    copy C:\utilman.exe C:\windows\system32\utilman.exe
    
    Confirm the overwrite and then restart your computer.
    Important: Undoing this hack will have no impact on your new password. Whatever password you set in Step 11 is still valid.

Tips:

  1. Having trouble resetting your Windows 7 password? See Get More Help for information about contacting me on social networks or via email, posting on tech support forums, and more.

How To Boot From a CD, DVD, or BD Disc

Booting from a CD, DVD, or BD is sometimes necessary to run advanced tools like memory testing programs and password recovery tools.
You'll also need to boot from a disc if you're planning to reinstall Windows or run repair tools like a Startup Repair or Recovery Console.
When you boot from a disc, what you're actually doing is running your computer with a smalloperating system that's installed on the CD, DVD, or BD. When you start your computer normally, you're running with the operating system installed on your hard drive - Windows, Linux, etc.
Follow these easy steps to boot from a disc:
Difficulty: Easy
Time Required: Booting from a CD, DVD, or BD usually takes less than 10 minutes.

Here's How:


  1. Change the boot order in BIOS so the CD, DVD, or BD drive is listed first. Some computers are already configured this way but many are not.
    If the optical drive is not first in the boot order, your PC will start "normally" (i.e. boot from your hard drive) without even looking at what might be in your disc drive.
    Note: After setting your optical drive as the first boot device in BIOS, your computer will check that drive for a bootable disc each time your computer starts. Leaving your PC configured this way shouldn't cause problems unless you plan on leaving a disc in the drive all the time.
  2. Insert your bootable CD, DVD, or BD in your disc drive.

    How do you know if a disc is bootable? The easiest way to find out if a disc is bootable is to insert it in your drive and follow the remainder of these instructions. Most operating system setup CDs and DVDs are bootable, as are many advanced diagnostic tools like the ones I discussed above.
    Note: Programs downloadable from the Internet that are intended to be bootable discs are usually made available in ISO format. See How To Burn an ISO File for more information.
  3. Restart your computer.


  4. Watch for a Press any key to boot from CD or DVD... message.

    When booting to a Windows setup disc, and some other bootable discs as well, you may be prompted with a message to press a key to boot to the disc. To boot from the disc, you'll need to press any key on your keyboard (like the space bar) within the few seconds that the message is on the screen.
    If you do nothing, your computer will check for boot information on the next boot device in the list in BIOS (see Step 1) which will probably be your hard drive.
    Some bootable discs do not prompt for a key press and will start immediately.
  5. Your computer should now boot from the CD, DVD, or BD disc.
    Note: What happens now depends on what the bootable disc was for. If you're booting to a Windows 7 DVD, the Windows 7 setup program will begin. If you're booting to aSlackware Live CD, the version of the Slackware Linux operating system you've included on the CD will run. You get the idea.
    If you tried the above steps but your computer did not boot from the disc properly, check out some of the tips below.

Tips:

  1. Recheck the boot order in BIOS (Step 1). I've found that the number one reason a bootable disc won't boot is because BIOS is not configured to check the CD/DVD/BD drive first.
  2. Do you have more than one optical drive? Your computer probably only allows for one of your disc drives to be booted from. Insert the bootable CD, DVD, or BD in the other drive and restart your computer.
  3. Clean the disc. If the disc is old, as are many Windows Setup CDs and DVDs by the time they're needed, clean it. A clean disc could make all the difference.
  4. Burn a new CD/DVD/BD. If the disc is one you created yourself, like from an ISO file, then burn it again. The disc may have errors on it that reburning could correct. I've had this happen to me more than once.

Optical Disc Drive


What is an Optical Disc Drive?:

Optical drives retrieve and/or store data on optical discs like CDs, DVDs, and BDs (Blu-ray discs) which hold much more information than classic portable media options like the floppy disk.

The Optical Disc Drive is Also Known As:

optical drive, ODD (abbreviation), CD drive, DVD drive, BD drive, disc drive

Important Optical Disc Drive Facts:

Most optical drives can play and/or record onto a large number of different disc formats.
Popular optical drive formats include CD-ROM, CD-R, CD-RW, DVD, DVD-RAM, DVD-R, DVD+R, DVD-RW, DVD+RW, DVD-R DL, DVD+R DL, BD-R, and BD-RE.
Reference your optical drive's manual before purchasing media for your drive to avoid incompatibility issues.

Popular Optical Disc Drive Manufacturers:

Optical Disc Drive Description:

An optical drive is about the size of a thick soft cover book. The front of the drive has a small Open/Close button that ejects and retracts the drive bay door. This is how media like CDs, DVDs, and BDs are inserted into and removed from the drive.
The sides of the optical drive have pre-drilled, threaded holes for easy mounting in the 5.25 inch drive bay in the computer case. The optical drive is mounted so the end with the connections faces inside the computer and the end with the drive bay faces outside.
The back end of the optical drive contains a port for a cable that connects to the motherboard. The type of cable used will depend on the type of drive but is almost always included with an optical drive purchase. Also here is a connection for power from the power supply.
Most optical drives also have jumper settings on the back end that define how the motherboard is to recognize the drive when more than one is present. These settings vary from drive to drive so check with your optical drive manufacturer for details.

Hard Disk Drive


What is a Hard Disk Drive?:

The hard disk drive is the main, and usually largest, data storage device in a computer. The operating system, software titles and most other files are stored in the hard disk drive.

The Hard Disk Drive is Also Known As:

HDD (abbreviation), hard drive, hard disk, fixed drive, fixed disk, fixed disk drive

Important Hard Disk Drive Facts:

The hard drive is sometimes referred to as the "C drive" due to the fact that Microsoft Windows designates the "C" drive letter to the primarypartition on the primary hard drive in a computer by default.
While this is not a technically correct term to use, it is still common. For example, some computers have multiple drive letters (e.g. C, D, E) representing areas across one or more hard drives.

Popular Hard Disk Drive Manufacturers:

Hard Disk Drive Description:

A hard drive is usually the size of a paperback book but much heavier.
The sides of the hard drive have pre drilled, threaded holes for easy mounting in the 3.5 inch drive bay in the computer case. Mounting is also possible in a larger 5.25 inch drive bay with an adapter. The hard drive is mounted so the end with the connections faces inside the computer.
The back end of the hard drive contains a port for a cable that connects to the motherboard. The type of cable used will depend on the type of drive but is almost always included with a hard drive purchase. Also here is a connection for power from the power supply.
Most hard drives also have jumper settings on the back end that define how the motherboard is to recognize the drive when more than one is present. These settings vary from drive to drive so check with your hard drive manufacturer for details.

Power Supply Unit


What is a Power Supply Unit?:

The power supply unit's job is to convert the power provided from the outlet into usable power for the many parts inside the computer case.

The Power Supply Unit is Also Known As:

PSU, power supply, power pack, power converter

Important Power Supply Unit Facts:

Motherboards, cases and power supplies all come in different sizes called form factors. All three must be compatible to work properly together.
A PSU is not usually user serviceable. For your safety, it's usually wise to never open a power supply unit.

Popular Power Supply Unit Manufacturers:

CoolMaxUltra, (Most power supply units are preinstalled in computer cases)

Power Supply Unit Description:

The power supply unit is mounted just inside the back of the case.
The side of the PSU facing outside the case has a male, three pronged port that a power cable, connected to a power source, plugs into. There is also often a power switch and a power supply voltage switch.
Large bundles of colored wires extend from the opposite side of the power supply unit into the computer. Connectors at the opposite ends of the wires connect to various components inside the computer. Some are specifically designed to plug in to the motherboard while others have connectors that fit into fans, floppy driveshard drivesoptical drives, and even some high powered video cards.
Power supply units are rated by wattage to show how much power they can provide to the computer. Since each computer part requires a certain amount of power to function properly, it's important to have a PSU that can provide the right amount. The very handy Thermaltake Power Supply Calculator tool can help you determine how much you need.

How To Troubleshoot a Noisy Computer Fan


Fans located throughout the inside of the computer help to dissipate the large amount of heat generated by the CPU, the power supply and other components.
Noisy fans are an indication that they are not working properly which means that heat may be building up inside the computer - a potentially damaging scenario.
Follow these steps to determine why one or more of these fans may be making loud or strange noises.
Difficulty: Average
Time Required: Anywhere from 15 minutes to 1 hour depending on the cause of the noisy fan

Here's How:

  1. Clean the CPU fan.
  2. Clean the power supply fan.
  3. If the noise persists and can be narrowed down to the CPU fan, replace the CPU fan.
  4. If the noise persists and can be narrowed down to the fan inside of the power supply, replace the power supply.
    Note: Due to safety concerns, it is never recommended to open the power supply and replace only the fan. I always recommend that the entire power supply be replaced instead.
  5. Many fans in perfect working order will simply get louder as the system gets hotter. In this case, it may be necessary to move your PC to a cooler area.
  6. If moving the PC is not an option, you may need to invest in more powerful fans or in a more advanced cooling system like liquid cooling.

Important Computer Repair Safety Tips

In addition to being an afternoon of great fun, PC repair can save you loads of time and money. No amount of fun, money or time is enough, though, to compromise your safety.
Keep these important tips in mind as you work inside your computer:


Always, always, always remember to turn the power off before servicing anything. This should always be your first step. Do not even open the computer case unless the power is turned off. Many computers have a number of lights inside that serve certain functions so check to see that no lights are on. If any are still on then the power is probably not completely off.
Many power supply units have a switch on the back, killing power to the device and ultimately the rest of your PC. If your PSU has one, be sure to turn it to the off position.


Unplug for Extra Safety

As a second precaution, it is wise to unplug the computer from the wall or power strip. If there was any doubt as to whether the computer was off before, it's settled now.

Avoid Smoke and Smells

See smoke coming from the power supply or inside the case or smell a burning or solder scent? If so:
  1. Stop what you're doing immediately.
  2. Unplug the computer from the wall.
  3. Allow the PC to cool or discharge unplugged for at least 5 minutes.
Finally, if you know which device was generating the smoke or smell, remove and replace it as soon as you can. Don't try to repair a device that's been damaged to this extent, especially if it's a power supply.

Remove Hand Jewelry

An easy way to get electrocuted is to work around a high voltage device like a power supply with metal rings, watches, or bracelets on. Remove anything conductive from your hands before working inside your computer, especially if you're doing something like testing your power supply.

Avoid Capacitors

Capacitors are miniature electronic components contained in many of the parts inside a PC. Capacitors can store electric charge for a short while after the power is turned off so it's a wise decision to wait a few minutes after pulling the plug before working on your PC.

Never Service the Non-Serviceable

When you come across labels that say "No serviceable components inside" don't take it as a challenge or even a suggestion. This is a serious statement.
Some parts of a computer are just not meant to be repaired, even by most professional computer repair persons. You will usually see this warning on power supply units but you may also see them on monitors, hard drives, optical drives and other dangerous or highly sensitive components.